DSLR Raw file workflow
Written 2020-06-18 by Kalle
7 min read | 1202 words
With my new camera, a Nikon D800, image files are much larger than with my old camera. The RAW image files are so large that my laptop struggles to keep up with my old workflow. Therefore, I've had to develop a new workflow which gradually reduces the number of files.
1. Shoot in RAW + JPEG
By shooting in RAW + JPEG, I always get a pre-processed copy of each image stored automatically on my SD-card. For instance, the RAW file DSC_1519.NEF is accompanied by DSC_1519.JPG. The algorithm used by the camera to "develop" the JPEG in-camera can be configured in detail in the camera's settings. Since the RAW file is unprocessed, the JPEG often looks better than the RAW file. To reach the same, or a better looking result with the RAW file, manual image processing is needed. Many times, I won't bother with manual processing because the JPEG is good enough, but I always want to be able to use the RAW for especially nice shots.
2. Select candidates in Adobe Bridge
Having plugged my SD-card into my laptop, I open Adobe Bridge, which is a free digital asset management program. The good thing about Bridge is that it allows for light-weight filtering, viewing, sorting, etc. of images without needing to import anything. This means that I can filter my images directly on my SD-card instead of first transferring several gigabytes of images to the limited SSD storage on my laptop.
My workflow in Bridge is as follows:
- Navigate to the directory of the images.
- Activate a filter to show only JPEG images and hide the rest.
- Browse through all images using the arrow-keys.
- "Select" files to keep by scoring them using the keyboard shortcut
⌘-1. The actual score doesn't matter; the important part is that they receive a score. - Activate a filter to show only unscored images.
- Move all unscored images to the trash and empty the trash to clear them from the SD-card.
3. Delete RAW files with script
After the previous step, the folder containing the image files has all RAW files, but only corresponding JPEG:s for the candidates selected in the previous step:
...
DSC_1517.NEF
DSC_1518.NEF <- No corresponding JPEG
DSC_1519.JPG
DSC_1519.NEF
DSC_1520.NEF <- No corresponding JPEG
DSC_1525.JPG
DSC_1525.NEF
...
The next step is therefore to delete the RAW files for which there is no corresponding JPEG. This can be done in a number of ways. The one i selected was to write a Python script which I named delete_raws and placed in /usr/local/bin. The script uses the argparse module to add an optional argument --base_dir. This way, the script can either be invoked for the current working directory (by not supplying --base_dir) or for a certain directory.
#!/usr/bin/env python3

import argparse
import os
from glob import glob

extensions = ('JPG', 'NEF')

def get_files(base_dir, extension):
    return glob(os.path.join(base_dir, f'*.{extension}'))

def get_file_name(path):
    return os.path.splitext(path)[0]

def get_file_names(paths):
    return (get_file_name(p) for p in paths)

def delete_file(base_dir, file_name, extension):
    os.remove(f'{file_name}.{extension}')

def delete_files(base_dir, file_names, extension):
    [delete_file(base_dir, file_name, extension) for file_name in file_names]

def run(base_dir):
    if not base_dir: base_dir = os.getcwd()
    jpegs, raws = (get_files(base_dir, extension) for extension in extensions)
    if not jpegs:
        print('Found no jpegs')
        return
    if not raws:
        print('Found no raws')
        return
    jpegs, raws = (set(get_file_names(paths)) for paths in (jpegs, raws))
    uniquely_raws = raws - jpegs
    delete_files(base_dir, uniquely_raws, 'NEF')
    print(f'Deleted {len(uniquely_raws)} raw files')

if __name__ == '__main__':
    parser = argparse.ArgumentParser(description='Delete unique raw files, leaving only thos with corresponding jpeg.')
    parser.add_argument('--base_dir', metavar='d', type=str, help='The directory of the image files.')
    args = parser.parse_args()
    run(args.base_dir)
After the script has run, the image folder contains an equal number of RAWs and JPEGs:
...
DSC_1519.JPG
DSC_1519.NEF
DSC_1525.JPG
DSC_1525.NEF
...
4. Edit in Capture One and export as JPEGs
My image editor of choice nowadays is Capture One which I prefer over Adobe Lightroom because of its lightweight feel.
I import the images for a photo shoot to a Capture One Session and then apply edits as I see fit. I also select either the JPEG or the RAW file for each shot and delete the other.
When finished, I end up with a mix of JPEG and edited RAW files, which I then develop using Capture One's develop tool set to export as JPEGs of full size and quality. This results in a directory with processed JPEGs.
6. Transfer image creation date
When exporting images from an image editing software, the creation date of the file is lost. This is not an issue when importing the image to Apple Photos (or similiar) since the program extracts the capture date from the EXIF info of the file. When browsing the exported image in Finder on macOS, however, the date presented is the date of creation for the file, not for the information contained in the file. This is not an issue, but annoying.
To remedy this, I've written a script which overwrites the file modification date with the time of capture.
The script utilizes the library ExifTool by Phil Harvey (which is the most impressing library I've eveer used!).
To list the exif information of an image, e.g. DSC_1739.jpg, navigate to the image's directory and type
exiftool DSC_1739.jpgA large amount of information is listed
> exiftool DSC_1739.jpg
ExifTool Version Number         : 12.01
...
File Modification Date/Time     : 2020:07:10 18:04:31+02:00
File Access Date/Time           : 2020:07:13 07:51:37+02:00
File Inode Change Date/Time     : 2020:07:13 07:51:16+02:00
...
Create Date                     : 2020:07:04 08:19:08.60
Date/Time Original              : 2020:07:04 08:19:08.60
...
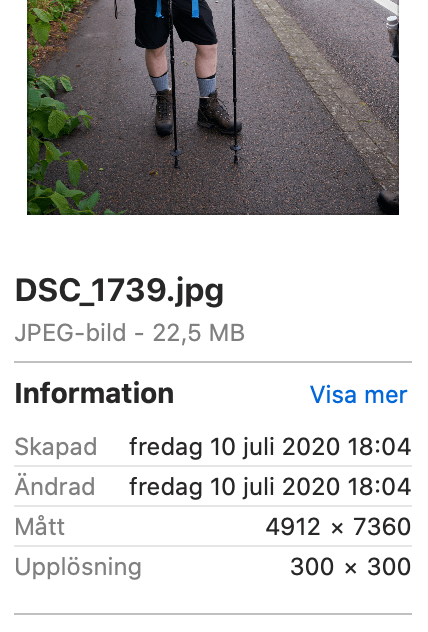
Create Date and Date/Time Original are identical (and correct), but File Modification Date/Time differs. When looking at the image in macOS Finder, the date of creation and modification correspond to File Modification Date/Time:
The script to transfer the information is as follows:
#!/usr/bin/env python3

import os
from re import search
from glob import glob

DATE_TAGS = ('datetimeoriginal', 'createdate', 'modifydate', 'filemodifydate')
DATE_PATTERN = '20\d\d:\d\d:\d\d \d\d:\d\d:\d\d' # e.g. 2020:07:04 08:19:08

def process_image(path):
    date = parse_date(path)
    if not date: return False
    apply_date(date, path)
    return True

def parse_date(path):
    output = os.popen(f'exiftool -{DATE_TAGS[0]} "{path}"').read()
    output = search(DATE_PATTERN, output)
    return output.group() if output else None

def apply_date(date, path):
    tag_info = ' '.join([f'"-{tag}={date}"' for tag in DATE_TAGS])
    command = f'exiftool -overwrite_original {tag_info} "{path}"'
    os.popen(command)

def get_all_image_paths(extensions=['jpg', 'JPG', 'jpeg', 'JPEG', 'nef', 'NEF']):
    return [f for e in extensions for f in glob(f'*.{e}')]

if __name__ == '__main__':
    num_errors, paths = 0, get_all_image_paths()
    for path in paths:
        success = process_image(path)
        if not success:
            print(f'Failed to process {path}')
            num_errors += 1
        else:
            print(f'Successfully processed {path}')

    print(f'Successfully processed {len(paths)-num_errors} image files. Encountered {num_errors} errors.')
I've named the script transfer_image_dates and put it in /usr/local/bin.
After running the script, running exiftool DSC_1739.jpg again yields the following:
> exiftool DSC_1739.jpg
ExifTool Version Number         : 12.01
...
File Modification Date/Time     : 2020:07:04 08:19:08.60
File Access Date/Time           : 2020:07:13 07:51:37+02:00
File Inode Change Date/Time     : 2020:07:13 07:51:16+02:00
...
Create Date                     : 2020:07:04 08:19:08.60
Date/Time Original              : 2020:07:04 08:19:08.60
...
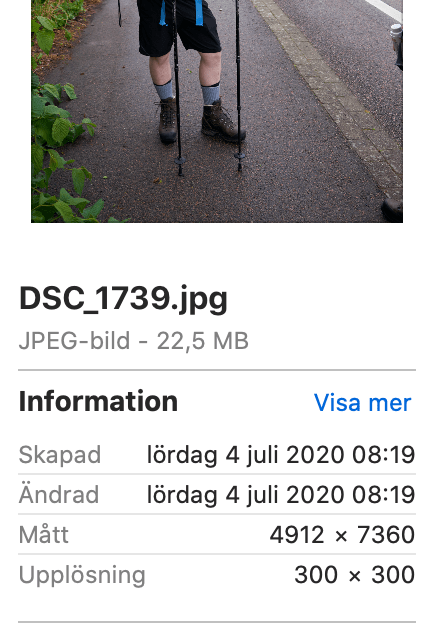
and the macOS Finder shows the following:
7. Import to Apple Photos
My final step is to import the exported JPEGs to an album in Apple Photos. This serves as my backup solution and enables easy sharing with family and friends.

